A bad case of blisters made the boat affordable; upgrades were the expensive part.
It all started innocently enough. It was mid-October of 1990, and we were going to Texas anyway to visit cousins in San Antonio and then on to the Clear Lake area near Houston. I had seen ads in sailing magazines for Valiant Yachts and noticed their facilities were located in Gordonville, Texas. We would be going right by on Interstate 35 and thought it would be great to visit the factory. I had read about Valiants and their reputation as offshore cruising boats and had admired their looks from afar. A letter to Valiant brought a prompt response and invitation to stop by.
We were taken on a tour of the factory by Stan Dabney, who, with his wife, Sylvia, was working at the factory while their Valiant 40, Native Sun, was being repaired after being damaged in Hurricane Hugo. They were among the founders of Valiant. (That story was related by Sylvia in the September 1998 issue of Good Old Boat.) We were very impressed with the boat and the factory operation. If we were “rich instead of good looking,” as the saying goes, we would have signed up to buy a new Valiant 40 on the spot. But as I was cheated on both counts, we couldn’t afford even the used ones we saw among the brokerage boats there.
While touring the facility, we noticed several used Valiants on jack stands with the gelcoat stripped. Stan explained they had been purchased to be refurbished during the slack season but the area had suffered severe flooding so repairs on these boats had been put on hold.
After thanking Stan for his time, we headed for San Antonio. As we traveled, we debated and schemed about how we could manage to own a Valiant. Our present boat was a Pacific Seacraft Flicka. Since we have bigger dreams than bank account, we had purchased her and refurbished her with the goal of doing some cruising. However I am over 6 feet tall and Jeanette, my wife, is almost 5 feet 10 inches. We soon found that the Flicka was wonderful for short trips but too confining for an extended cruise. I would be able to take an early retirement within five to seven years, and we had set a goal to find a boat we could have ready to cruise by then.
 In Clear Lake, we looked at a used Valiant 32. It was completely disassembled in the midst of being refurbished. It was for sale “as is.” Looking back, the asking price was not out of line, however I did not feel confident in my ability to put something back together that someone else had taken apart on his word that all the pieces were present.
While we were there, we kept thinking of the Valiant 32 we saw in the boatyard at Cedar Mills in need of repair and refurbishing. Perhaps they would sell it to us “as is.” At Jeanette’s urging, I called Stan with that question. We reached an agreement on price and told him we would be stopping by on our way back to Missouri in a couple of days to examine the boat and close the deal.
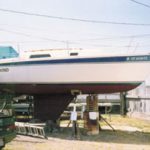
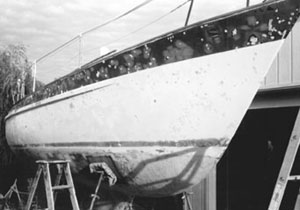
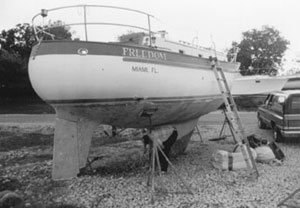
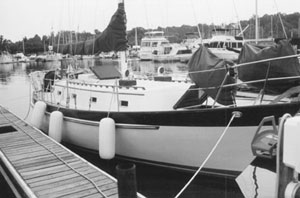
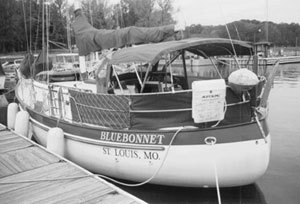
Her name was Freedom. She had a white hull with a dark blue stripe below the caprail and a red bootstripe above the waterline. We decided immediately that the boat would be repainted the same colors. In honor of my wife’s native state and the state where we found her, we would name her after the state flower of Texas, Bluebonnet. The interior was in very good condition, though it needed cleaning and new upholstery. The exterior, however, was going to need a lot of work; it had blisters everywhere, not just on the bottom. Stan explained that the previous owner of Valiant Yachts, Uniflite of Bellingham, Wash., had constructed their Valiant sailboats and Uniflite powerboats for a time in the late 1970s with a polyester resin that had a fire retardant additive. The additive caused the boats to blister badly. Uniflite dropped the fire retardant additive in the early 1980s, but by that time it was too late. Due, in part at least, to the blistering problems, Uniflite was sold. The new owner was not interested in sailboats and sold the Valiant name, molds inventory, and so on to Rich Worstell. He moved the manufacturing operation to Texas in the mid-1980s.
Stan and I made a complete inventory of the boat, its rigging, sails, and equipment. He furnished us a copy of the owner’s manual and gave us the history of the boat. We determined what materials we might need from the factory and purchased them to be shipped with the boat. We signed the papers for the boat and headed home.
Preparations
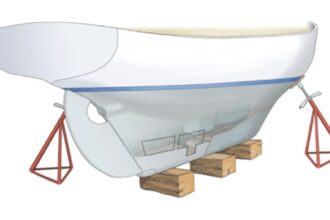
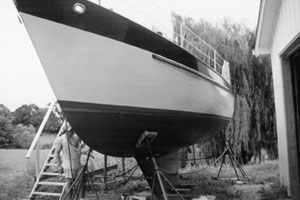
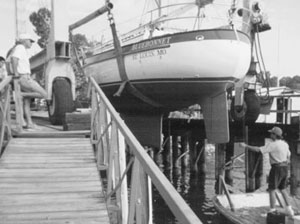
Arriving home, we made arrangements to have the boat shipped to our back yard. We lived outside Kansas City, Mo. We purchased five jack stands with the boat. We used four at a time. The fifth one allowed us to move a stand in order to work in the area where it had been. In preparation for the boat’s arrival, I purchased three pressure-treated plywood sheets and two pressure-treated 4 by 4s. I also made three sturdy sawhorses to hold the mast.
It was early December when the boat arrived. The sawhorses were spaced out evenly, and the crane picked the mast off the boat and set it on the sawhorses. Then it picked up the boat. We spaced the plywood sheets and 4 by 4s under the keel. Then we arranged the jack stands. The plywood and 4 by 4s prevented the keel and jack stands from shifting due to rain or the spring thaw.
Winter weather made working on the boat impossible, so I spent the time purchasing the necessary materials and tools to start in the spring. The boat sat next to my workshop where I had access to an air compressor and air orbital and jitterbug sanders. I also had an electric palm sander. I found that a Dremel tool was indispensable for opening blisters. I removed the teak hatchboards and replaced them with plywood, so I could refinish the boards later. I did the same with the large opening hatches on the cabintop and foredeck. They were made with teak frames, and as all the exterior teak had been allowed to weather to a rough gray, the hatches needed to be disassembled, refinished, and have the Plexiglas rebedded.
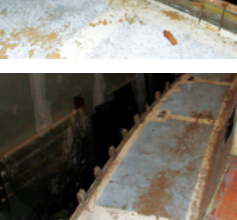
I also did some research on the Valiant blistering problem. I discovered that instead of osmosis blisters caused by water penetrating the gelcoat from the outside and setting up a chemical reaction in the laminate to cause blisters, these blisters are caused by the fire retardant not having kicked with the polyester resin. This retardant then slowly wicks its way through the laminate to the surface and forms blisters under the gelcoat. These blisters will show up on the bottom, topsides, decks, and cabintop. They seem to be more evident in warm climates and waters. The retardant seems to wick itself to the surface when the laminate is warmest. Boats sailed exclusively in the cold waters of the Pacific Northwest and Alaska were very slow to develop blisters.
Through the advice of friends and from observations at the factory, I used West System epoxy products for the repairs. I used their epoxy and fillers and purchased several of their booklets and a video on fiberglass repair. The folks at Gougeon Brothers were very helpful and informative the few times I called them with questions about a particular phase of the project. The total cost of the epoxy materials, including resin, hardener, fillers, additives, cloth, masks, acid brushes, stir sticks, sandpaper, and so on was about $1,100. (See sidebar on Page 13 for a breakdown of expenses.)
The project begins
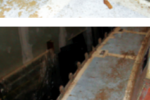
I started on the repair in spring 1991. The blisters on the hull above the waterline and on the deck and cabintop had not been opened. I opened and flushed them with water and left them to dry while I concentrated on the bottom. I filled the blisters with glass cloth and epoxy resin and faired the boat with epoxy resin mixed with fillers to make a putty the consistency of peanut butter. The bottom had some large deep blisters, while the topside blisters were just under the gelcoat. I left the bottom exposed to allow the hull to dry out, and I did not cover the bottom with a barrier coat until September the following year.
This was not highly skilled work, but it was time-consuming. At times I felt intimidated by the unending number of blisters. A lot of the blisters were dry; nothing was in them but a pocket of air under the gelcoat. Apparently the fire retardant had wicked to the surface and formed the blister. Then the porous gelcoat allowed it to evaporate. Since I was working full-time at my job, I spent afternoons after work on the boat project. Often 30 to 45 minutes a day was all the time I had. This was sufficient to sand down the previous day’s work and mix and fill in more areas.
The bottom received its barrier coat over the Labor Day weekend in 1992. Most of the repair work had been a one-man job, but the barrier coat required the additional efforts of my wife and our son. The hull must be close to air temperature before you begin to apply the barrier coat. If it has cooled overnight, it must be allowed to warm up, so no condensation will form on the hull. The barrier coat consisted of one coat of clear epoxy followed by six coats of epoxy with West System #422 barrier additive and a final coat of epoxy with #425 additive. The #422 is an aluminum powder that increases the epoxy’s resistance to water absorption and makes it more abrasion-resistant. The #425 is a fine copper powder that provides a backup to bottom paint and is extremely abrasion-resistant. The epoxy is applied with a foam roller, and someone follows around with a foam brush to tip off the bubbles which form.
When the first coat is applied, you start on the next coat as the first one has started to kick, usually in 30 to 45 minutes. You keep going around and around taking turns with the different tasks. You have to work fairly fast on a hot day, as the epoxy will have a short pot life. If you don’t finish in one day, you must wash the hull with clear water and a “scrubbie” and dry it with white paper towels. An excellent booklet, Fiberglass Boat Repair & Maintenance, is available from Gougeon Brothers. It is a must for anyone who works on fiberglass boats. (As a side note: the last time we had the boat hauled, in Sept. 1997, I buffed the bronze prop and coated it with epoxy resin with the #425 copper additive. I had some of the additive on hand, and the intent was to prevent barnacle growth on the prop. If it works I’ll pass that information on through Good Old Boat’s Mail Buoy column.)
After we covered the bottom with the barrier coat, I concentrated on the topsides, cabin, and deck. I repaired the damaged teak caprail and replaced the starboard teak rubrail.
The many small blisters filled with epoxy filler on the hull at times looked like zits on a teenybopper. Upon the recommendation of Gougeon Brothers, we gave the topsides two barrier coats of epoxy: one clear and one with the #422 additive. Looking back, I would not coat the hull above the waterline with epoxy, because the blister problem on a Valiant is from within, not from moisture coming from the outside. I painted the hull with Interlux Brightside one-part polyurethane paint with a brush. I did not have an enclosure large enough nor the experience to spray it with a two-part polyurethane such as Awlgrip or Imron. I have been very pleased with the result however, and touch-ups and repairs are easy.
Related projects
After repairing the blisters and filling in the holes where the old depth and knot instruments had been, I painted the deck, cockpit, and cabintop with the same paint. I added a flattener to the white to reduce the glare, masked off the non-skid areas, and painted them light gray with a commercial non-skid powder added. As some areas of the non-skid had been removed to repair blisters, the grit in the paint gave it an even look. The two-tone look is very pleasing to the eye.
I sanded the exterior teak, except for the hatches and Dorade boxes, and gave it several coats of Sikkens Cetol. I varnished the rest of the teak and covered it with Sunbrella fabric. An annual topcoat of Sikkens keeps the teak looking great.
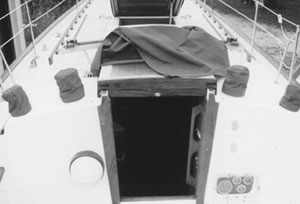
As I discussed in the January 1999 issue of Good Old Boat, I also had to repair a leak in the diesel fuel tank. In addition, I made a turtle, or hood, for the companionway sliding hatch. The Valiant factory wanted $500 for one, and I had the materials on hand anyway. I made a female mold, lined it with waxed paper and laid up the hood with epoxy and cloth. The top has a core of plywood. On a table saw, I made cuts in the plywood halfway through lengthwise and 1 inch apart, and then I turned the plywood over and cut it on the other side, staggering the cuts so the piece was very flexible. I coated the plywood with epoxy resin and laid it in the mold, adding more fiberglass cloth on top of it. After the hood came out of the mold, I trimmed and faired it, then painted it to match the cabintop. I added teak trim, and it turned out very nice. As the material was already on hand, all I had invested in it was the time.
The holding tank was a rubber composition bladder under the V-berth. I replaced it with a solid tank I made of 1/4-inch plywood and epoxy, using the stitch and glue technique. The tank is covered with glass mat and cloth inside and out and has a baffle inside for extra rigidity. It has an approximate capacity of 20 gallons. (More on this subject in a future issue of Good Old Boat.)
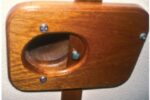
The boat had a tiller, but it was broken and delaminated. I could have ordered one from the factory, but as I was making everything else, I decided to make one. I bought some ash and mahogany lumber and ripped it in the table saw in strips 1/4-inch thick by 2 1/4 inches wide and 4 feet long. I built a jig using blocks of wood on a scrap piece of plywood. I bent the alternating strips of ash and mahogany around the blocks of wood in a pattern that matched the old tiller. When I was satisfied with its shape, I screwed the blocks onto the plywood. Then I removed the strips and covered the blocks and plywood base with waxed paper. I brushed epoxy resin on the strips, placed them in the jig, and clamped them in place with woodworking clamps. When the epoxy had hardened, I removed the tiller, shaped it with a belt sander, and varnished it.
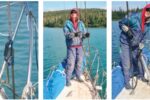
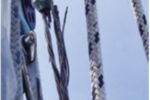
The standing rigging that came with the boat seemed to be in good shape but was of undetermined age, so I felt it should be replaced. I considered buying the wire and Norseman or Sta-lok fittings and doing the work myself. However I ended up having a rigging shop do the work for less than what it would have cost me. I had the top ends swaged and the bottom ends fitted with Sta-lok fittings. The rationale was that the bottom end usually goes bad from moisture running down into the swage. The sealant in the Sta-lok would prevent this and when a problem does occur, the repair can be done at deck level.
When I pressurized the water system, I found that the copper water lines had not been winterized properly and had split in several places under the cabin sole. I had to find all the split sections of copper tubing and cut them out. I inserted flexible plastic hose in place of the missing sections and clamped them with hose clamps. It required several attempts to pressurize the system to find all the leaks.

Blisters were cheap
When it came to upgrading the equipment and outfitting the boat, it soon became obvious that the cost of blister repairs had been very modest in comparison. The costs of the new cabintop winches for the halyards and mainsheet, new running rigging, new ground tackle, new depth sounder, and new knotlog added up quickly. The list went on and on. When I painted the spars, I replaced the wiring in the mast. The old wiring seemed to be usable, but with the mast on sawhorses, why not? All in all, we spent about three times as much on replacements and upgrades as we spent on the blister repairs. As there was no rush in purchasing the equipment, we tried to find it on sale. We were successful in this for the most part.
By Memorial Day of 1994, Jeanette was asking when the boat was going to be finished. We set a goal for the third week in July. A date was set to have the truck come and pick the boat up and take it to Kentucky Lake near Paducah, Kentucky.
We wanted the boat documented, and the staff at the Valiant factory handled it. We were thankful for this, since only they could have traced her ownership to satisfy the U.S. Coast Guard.
We launched her July 27, 1994, at Green Turtle Bay in Grand Rivers, Ky. That day will always be fresh in our memories. At the end of February of 1995, I took early retirement in order to spend time living on and sailing Bluebonnet. We spent several months on the boat and in the fall of that year, we sold our home, put our furniture in storage, and motored down the Tennessee-Tombigbee Waterway to Mobile Bay. From there, we sailed along the Gulf Coast to Mandeville, La., on Lake Pontchartrain. The trip covered more than 900 miles, and the boat performed flawlessly. The engine did not use any oil. Raw water pump impeller replacement was the only problem. We have purchased a home in Mandeville and sail the boat on the lake and on the gulf.
Lessons learned
Would we do it all over again? Yes! Would we do it the same way? No! There are many things we would change, but that is all part of life. You learn by doing, and as you learn you try not to make the same mistakes over again. To a couple who had been sailing a 20-foot boat on inland lakes, a 32-foot boat seemed like the Titanic. However after we sailed her and got used to sailing on the gulf and living aboard for longer periods, we got to thinking that maybe a Valiant 40 would have been the “perfect boat.” However Bluebonnet is comfortable, easy to sail, and so pretty we wouldn’t want to part with her. Besides, no boat is big enough for everything you want from a practical standpoint. You have to make choices and learn to compromise. I have a theory that, as your boat doubles in size, the things you want on it square.
We have continued to upgrade her. We added a Bimini, refrigeration for the icebox, and a new propane galley stove (a happy cook is a happy boat). There was a new dodger that was worth its weight in gold on the waterway in November. There was the new mainsheet traveler system. The old one had frozen bearings and was an orphan when it came to parts. And there was a roller furling system and a larger headsail. This past spring I installed Whitlock rack-and-pinion pedestal steering. All these additions have made the boat more comfortable and easier to sail. As you get older, this becomes more important.
When we went looking for a boat to cruise on upon retirement, we wanted a boat that would not restrict our dreams. We wanted a boat that would take us safely anywhere we wanted to go. We feel that we found and have such a boat. Whatever it is that keeps us from sailing off to the islands or New Zealand, it won’t be Bluebonnet.
Are the blisters fixed permanently? No. They won’t be fixed unless the gelcoat and several layers of laminate are completely removed and replaced with cloth and epoxy to completely seal in the retardant. Otherwise the retardant will continue to wick to the surface and form blisters or find a pinhole in the gelcoat and weep out. The blisters are not big maintenance items. Part of the annual spring maintenance is to open the few blisters that have cropped up and flush hem out with water. Then along with general cleaning and topcoating the teak, I fill in the blisters, sand them down and give them a coat of paint. A nuisance, yes, but as Stan Dabney told us, “Kiss those blisters. Without them, you couldn’t afford the boat.”
Cost breakdown tells the tale
The following is a breakdown of the expenditures for bringing the boat back to her former glory. They are broken down into two sections: the cost of blister repair and the cost of upgrades, not including the upgrades added after launching. The amount of upgrading you might want to do would depend on the size of your bank account. There are always new bells and whistles to buy for your boat, and you can always convince yourself that you need them. A major source of materials I used in the repairs was Jamestown Distributors in Jamestown, R.I., for epoxy products, paint, acid brushes, rubber gloves, tongue depressors, and so on. I had previously purchased a Sailrite sewing machine and sewed all the canvas covers for the boat. I later used the machine to convert the headsail to roller furling.
|
Blister
repairs |
|
| West System epoxy and hardeners, 15 gallons, used about 12 gallons (1991 & 92 prices) |
$600 |
| West System fillers and barrier coat additives |
$275 |
| West System 6-ounce glass cloth: 15 yards, 60 inches wide |
$120 |
| Interlux Brightside one-part polyurethane paint |
$125 |
| Varnish and Sikkens Cetol |
$135 |
| New teak caprail, two pieces from Valiant |
$100 |
| New teak rubrail, one piece from Valiant |
$60 |
| Miscellaneous (Sandpaper, masking paper, acid bushes, stir sticks, etc.) | $125 |
| Total | $1,540 |
Bottom paint: Not a blister repair cost, nor an upgrade, but still necessary to get the boat ready to launch: Interlux Micron CSC 4 gallons |
$470 |
|
Upgrades and replacements |
|
| Four new Barient self-tailing winches for cabintop, 2 two-speed and 2 single-speed for halyards and staysail sheets. Old ones were in good condition, but we wanted self-tailing. On sale when Barient discontinued sales in U.S. |
$1,275 |
| Richie compass |
$154 |
| Running rigging |
$300 |
| Standard depth sounder and knotlog: $285 each |
$570 |
| 35-pound Delta plow anchor |
$237 |
| New England nylon anchor rode 300 feet @ .36 |
$108 |
| BoatU.S. 5/8-inch nylon line for docklines, etc., 300 feet @ .33 |
$100 |
| 10 x 28 fenders 6 @ $30 |
$180 |
| Standard VHF |
$148 |
|
Additional to rewire the mast |
|
| Coax | $80 |
| 14/2 triplex – tinned 100 feet |
$23 |
| 14/3 triplex – tinned 100 feet |
$36 |
| Spreader lights |
$40 |
| Anchor/tri-color light |
$67 |
| Total to rewire mast |
$246 |
Exide #SP-30H gel-cell batteries 3 @ $120 |
$360 |
| New lifelines (I did them myself, price includes cost of the tool) |
$211 |
| New standing rigging (swaged top and Sta-lok bottom) |
$1,133 |
Total upgrades and replacements |
$5,022 |
These prices were current in 1991-1994. Although the totals may differ today, the ratio of repair to upgrades and outfitting costs is valid. If you could find a blistered Valiant that was fully equipped with up-to-date equipment, the boat would be an even greater value. If you didn’t have the skill, inclination, or facilities to work on the boat yourself and had to pay a boatyard to do the work, it would be questionable whether the project would be practical.
Article from Good Old Boat magazine March/April 1999.