Picture a hot, windless Sunday afternoon as you power home on a glassy sea. Suddenly your engine slows and stops or overheats. Today of all days! You really did not need this, and it could have all been avoided.
How? By installing and maintaining filters to clean the fuel and water systems you and your boat need to operate successfully in a water environment. Filters come in many types and sizes and are custom-designed to serve a specific purpose. Many sailors tend to ignore the mechanical side of their vessels and assume the attitude that, “It’s a sailboat; it should sail, right?” Well yes, but the wind does not always blow in the desired direction or with the desired velocity. In times of need, our mechanical friends on board make the difference between a reasonable end to a cruise, no matter how long or short, and a long wait on a hot and windless sea.
Filters fall into three groups. Required, for fuel and engine cooling water. Desirable, for engine oil, potable water, refrigeration cooling, and seawater uses. Cosmetic, for air and sound filtration. Let’s take a detailed look at each type available for today’s vessels.
Pre-tank filters
Fuel filters can be defined as pre-tank, primary, and secondary. A pre-tank filter would be a funnel type that provides basic filtering of the fuel as it is poured or pumped into the tank. This type of filter is very basic but very valuable. They range from a plastic funnel with a screen in the bottom to catch dirt, leaves, and large contaminants such as bits of plastic, to the more sophisticated Baja filter. The Baja filters are aluminum funnels designed for cruisers who travel remote cruising grounds such as the Sea of Cortes, adjacent to Baja California in Mexico, where fuel is scarce and supplied in used 55-gallon drums of dubious origin.
Baja filters have two extremely fine stainless steel mesh screens to trap fine particulate matter (sand, dust, etc.) and a water-resistant filter to keep out a large majority of water that may be present in the fuel. The filters are really designed for diesel fuel but will assist in filtering gasoline. The Baja filter protects your tank from water-loving bacteria and helps prolong the useful life of the onboard primary and secondary filters.
Primary filters
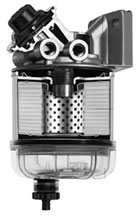
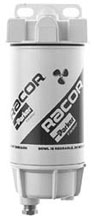
Primary filters are the off-engine filters, usually added as after-market equipment to your fuel system. Their manufacturers have names like Racor, Fram, Sierra, and Groco. The filters come in single or multiple units, in-line or independent mount, spin-on element or turbine.
Filters are sized in accordance with the projected fuel flow per hour required by a specific size engine. Diesel engines, because they return unused fuel to the tank, will have a larger flow rate in gallons per hour (gph) than equivalent gasoline engines but will consume less fuel per hour. The filter must be sized for the flow rate, not the consumption rate, of the engine. The gasoline engine either burns or discharges as unburned all fuel fed into it.
A rule of thumb for sizing filters for gasoline engines is 10 percent of maximum horsepower equals gallons per hour (gph). My 30-hp Atomic 4 gasoline engine has a potential maximum gph of 10% x 30 hp = 3 gph. I don’t think the engine will ever burn this amount as it never runs at peak power but, theoretically, it could. My primary filter is a Racor 200 series turbine with a 15 gph flow rate. Overkill? Sure but it works all season long.
A diesel engine flow rate is horsepower x 18% = gph, thus a 30-hp diesel would have a theoretical flow rate of 5.4 gph.
A filter that is oversize for the projected gph will work and last longer than an exact gph filter. A filter that is too small (less than the calculated potential gph) may restrict fuel flow and cause engine performance problems. With filters, bigger – within reason – is better.
The newest type of fuel filters is the spin-on canister type which looks like the familiar spin-on oil filter we use for our automobiles. They are very differenton the inside, however. Spin-on filters are commonly chosen for gasoline engines, while spin-on and turbine type filters are commonly used on diesel engines. The larger diesels usually use turbine type filters. Pure fuel is more critical to diesel engine operation as the injectors of a diesel are particularly sensitive to particulates in the fuel.
Spin-on elements are easier to change out than turbine units, and when you change a spin-on element, you renew the whole filter. In turbine units, you can change the paper element and still have particles and water in the filter if you do not completely disassemble and clean all parts of the unit. Some of the fine contaminants in the fuel of my Atomic 4 adhered so tenaciously to the turbine vanes they required scraping to remove. Is it any wonder we need good filters when the contaminants in our fuel harden up like concrete?
Filters come as filters alone or as a combination filter and water separator. Three-stage filters have a turbine section for large particles or gross amounts of water, a coalescing ring to trap the remaining water, and a micron element to remove fine particles. Filters are classified by microns. Different engines have different micron requirements. Racor’s standard filter size is 2 microns for their spin-on type filter/water separators. Their turbine type has elements that can be interchanged between 2, 10, and 30 microns. A common combination is a 10-micron primary filter and a 2-micron secondary (on-engine) filter.
If we use a Baja filter when we fill up the tank and still have water in the tank, where does the water come from? Since boat fuel tanks are vented, regular air interchange between the atmosphere in the tank and the external atmosphere takes place. A cycle is established in each tank when the air heats and expands during the day, and excess air is expelled through the vent line. When the ambient air cools, the air in the tank contracts and sucks in external air to equalize the pressure. The air that is sucked in is cool and damp, bringing moisture into the tank. This moisture condenses on the exposed interior of the tank forming droplets which fall into the fuel and settle on the tank bottom in the form of water.
If we never introduced water from contaminated fuel into the tank, we would still have some water in the tank from the condensation process. A good way to reduce this air interchange is to keep the tank topped up with fuel, thus limiting the air space available in the tank and minimizing atmospheric condensation.
In an effort to keep operating even with a plugged fuel filter, boats with larger engines may have multiple primary filters piped in such a manner that one filter may be used in the system while the other filter is being cleaned. This setup is more common to power boats and trawlers than to sailboats, but has definite merit. Multiple filters can be piped together as Primary A, Primary B, and so on. Finer and finer filtration is possible as the fuel passes through each stage. Usually single filters are designed to clean the fuel down to 2 to 10 microns (a micron is one one-thousandth of a millimeter). Filters are manufactured down to two microns so a multiple filter system could commence with a Primary A at 30 microns, Primary B at 10 microns, and a Primary C at 2 microns. At 2 microns, the fuel is very, very clean. Commercial firms that advertise that they “polish” your fuel use this multiple filter approach plus a centrifuge for a complete cleaning.
When considering a multiple filter system, remember that two filters piped in parallel to a common manifold will have a combined gph of the capacity of both filters, e.g., two 60-gph units will equal 120 gph. Three 60 gph filters piped in series (Primary A, B, and C), will have the gph of the single unit which is 60 gph.
Before we leave the primary filter discussion, let’s talk about filter maintenance. The best way to determine the state of cleanliness of a primary filter is to install a vacuum gauge on the discharge side of the filter. The gauge shows how hard the engine is having to “suck” to pull fuel through the filter. The higher the vacuum, the dirtier the filter and the greater the need to replace the element and clean the filter unit.
Racor makes a vacuum gauge that replaces the tee handle on the top of their turbine filter. This makes for a very neat installation. Individual vacuum gauges on single or multiple filters may be teed into the discharge line of each filter to reveal the state of the filtering element. The other ways to determine when to change a filter (other than vacuum gauges) are more subjective. A good method is to rely on running hours to set a time to change filter elements. This can be anywhere from 50-hour intervals to 200 hours depending on how careful you are in providing clean fuel. This is where the Baja filter will help extend the life of the primary and secondary filters.
If you do not use a pre-tank filter and put a load of contaminated fuel in the tank, a brand new filter may only last five minutes. Use a pre-tank filter or know, for sure, you are pumping or loading clean fuel. When I was a kid and worked at a fuel dock in Oyster Bay, New York, Gulf Oil provided off-pump, in-line gasoline filters in an effort to assure clean, waterless fuel. One of my daily jobs was to check the large storage tanks with a long rectangular wooden combination fuel gauge smeared with water finder paste to see how much fuel we had and if it had any water in it. Some ports today are not as careful about providing clean fuel. Even fuel purchased at the local gas station may not have an in-line filter and may give you a good dose of water.

Secondary filters
Assuring clean fuel to start with is your best guarantee of trouble-free engine performance. After the fuel has passed through the pre-tank and primary filter stages, it flows to the engine and the secondary filter. The secondary stage may be as simple as a screen in the intake line of a gasoline carburetor or another canister-type filter mounted directly on a diesel engine. The secondary filter on my Atomic 4, which is equipped with an electric fuel pump, is in the bottom of the fuel pump itself and is a fine nylon screen on a round plastic frame. I recently received a communication from Don Moyer of Moyer Marine recommending the addition of an in-line filter between the fuel pump and the carburetor. Compared to a 10-micron primary filter, my screen is pretty coarse, but then this is a gasoline engine, not a diesel.
The engine manufacturer normally provides the secondary fuel filter, sized to the engine. Other than carrying a spare element or having a screen you can clean, there is little to be done with the secondary element. If the primary filter system is efficient in cleaning the fuel, the secondary system should be trouble-free except for an annual maintenance. Remember, clean fuel is the lifeblood of your engine. Take care to purchase a high quality marine (not automotive) type primary fuel filter and learn how and when to maintain it. You’ll really be glad you did when you are powering home over a hot or cold windless sea.
Engine overheating
In our second problem scenario, the engine overheats. The probable cause is trash in the seawater intake or strainer or a failed water pump impeller. Most sailboat engines are seawater cooled, either directly by seawater circulation or indirectly through a heat exchanger. The seawater enters the hull through a through-hull intake with a perforated round bronze screen over the outside or a rectangular finned through-hull. It is possible for the screen or fin to plug up with foreign debris or marine growth, but if the engine was running cool when you left the mooring and suddenly overheats, the problem is probably elsewhere.
I once chartered a sailboat in the Bahamas. I left the dock under power, and within five minutes the engine overheated. The problem was marine growth on the seawater strainer. The boat had not been properly maintained. On my own Pearson, I routinely check all the through-hulls with a mask and snorkel. Zebra mussels, barnacles, and even oysters love the cozy atmosphere of a through-hull connection.
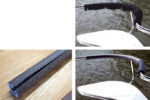
If it is not the through-hull, then where? The next step is the seawater strainer. This strainer should be installed in the seawater intake line between the seacock and the downstream distribution. I say downstream distribution because it is possible to use the seawater intake for more than one purpose, but that’s fodder for another article. The seawater strainer should be as large as practical. The larger it is, the more trash it can hold before becoming clogged. Groco makes a fine line of bronze and Plexiglas seawater strainers. Some other manufacturers are Puritan, Par, Vetus, and Forespar.
A pre-sail checkout should include making sure the seawater strainer is clean. A few minutes’ work will assure a trouble-free trip. I realize it is a pain to crawl into the bilge to check the seawater filter, but it is worth doing. I know it’s time to diet when I cannot easily climb into the cockpit seat lockers to check out the seawater filter. (Something about the ratio of sun to beer intake, according to my wife.)
Finally, if it is neither of the above, check the seawater pump impeller. Old impellers tend to throw off their blades, which then get caught in the engine cooling system and block the water flow. The only defense against this is to replace the impeller annually. Globe/Barco impellers are made of niprene, which is an elastomer combining properties of rubber, nitrile, viton, and neoprene. The impellers are self-lubricating. They are used by the U.S. Navy and Coast Guard and are sold by marine outlets. Carry at least one spare impeller, if not two.
If you change your impeller every season, or at least inspect it, you will know which tools are required and how much time it will take. On some engines, it is fast and easy, and on some it takes several hours. (Editor’s note: We remove ours during winter layup and lubricate the housing with Vaseline or water pump grease when we reinstall it.)
Water filters
Next let’s look at filters we need for our health and well being. Consumable water is a requirement for all manner of life on earth, sailors included. The concept of fresh water in our homes and on our boats is sometimes a misnomer. Scientists studying pollution worldwide are coming to the conclusion that water quality and quantity around the world is in serious decline and will constitute a major problem in the 21st century for the developed and developing countries of the world. Bacteria and toxins, along with chemical and hydrocarbon contaminants, endanger all of our earth’s water. Antiquated water treatment facilities are ill-equipped to handle today’s level and type of pollutants. Many of the new breeds of bug, especially cysts like Cryptosporidia cannot be effectively removed from the water supply. If this is true of the municipal water supply of the United States, consider the out islands and other remote locations. Even rainwater can pick up contaminants from the atmosphere on its way to the earth.
Now consider the water on board our good old boats. It may be anything but pure and fresh. It may taste of the bilge, smell of fiberglass, look like mildew, and carry particles of unknown origin. We need to take care of this most precious commodity. Remember, a person can live without food for more than 30 days but cannot live even five days without clean water.
We can have clear, sweet, clean fresh water on our boats through the care of our freshwater tanks and the use of filters to cleanse the water of many of its impurities prior to use. Pre-tank water filters are the equivalent of the Baja filter, which is used as we fill our fuel tanks. The least we can do in this regard is to use a funnel with a fine mesh screen to remove any solids that may be present in the water and, of course, to carefully select the source of our water in the first place. The best we can do is to use a pre-filter such as General Ecology’s Dockside Pre-Filter to keep dirt and sediment out of our freshwater tanks.
Letting the water in the fill hose run for a short while will go a long way toward assuring that we are getting fresh water from the supply, rather than the water in the hose. Water that has been sitting in plastic hoses will usually add an unpleasant taste to your water supply unless you have a special potable water hose made to eliminate the problem. Even if you do use a special hose, unless you can hook up to the hard piping of the source there may still be conventional plastic hose between your hose and the water source with the associated taste problem.
Water will also contain dissolved chemicals and contaminants that cannot be seen, tasted, or smelled but are not good for humans. These can be parasitic cysts, solvents, and other nasty critters and substances. Pre-filters will not remove these contaminants. Our water tanks provide an almost ideal breeding environment for these nasty substances to grow and multiply. Fungi, Giardia cysts, amoebic cysts, microscopic worms, larvae, and other undesirable creatures and plants thrive in this environment. The problem is exacerbated by taking on water from different sources. Various water supplies contain different pollutants which can “gang up” to create problems they would not normally cause by themselves.
We are usually our greatest enemy in the fight for clean water. We fill the tanks at the beginning of the season and use the water sparingly during our time aboard. Weekend to weekend the water sits in the tank and “grows” things. We don’t want to waste our water supply and dump it every week, and we can’t clean the tank every week, so, what to do?
The first step in assuring a clean, sweet water supply is to find a supply that is sweet to begin with. We are going to use a lot of water to clean up our onboard supply. Next, we add 2/3 cup of bleach (sodium hypochlorite) diluted in one gallon of sweet water for every 10 gallons of tank capacity. Fill the tank to the brim with the mixture and let it sit for 24 hours. Dump all of the water and start over, this time add one quart of white vinegar for every 5 gallons of tank capacity, fill to the brim again, and let it sit for 48 hours. Then dump it – all of it.
Next, fill the tank with sweet water with no additives, let it sit for another 24 hours and dump it. Refill the tank adding one teaspoon (1/6 oz.) of sodium hypochlorite for every 10 gallons of water. The water in your tanks should now be sweet and clean. This procedure is time-consuming but not hard to accomplish. The hardest part will be assuring you have completely drained the tank at each stage of the cleaning process. (Editors’ note: If you have any physical reaction to water with bleach in it – a sore throat, for example – keep flushing until you don’t, and then don’t add more bleach. We have experienced problems with bleach, even in minute quantities, in our drinking water.)
The bleach should have killed off any mold, mildew, or other bacteria in the tank. It will not kill cysts and parasites, but we will handle them with our onboard filters. The vinegar will neutralize the bleach taste and fiberglass smell. The series of rinses will remove any particulate matter leaving a clean water supply.
Be sure, when you are accomplishing the above, that you flush the supply lines from the tank to the fixtures, as these sometimes enable things to grow. Pulling water through the system for all treatments will accomplish this for you easily. You need not pull all the water through the system. Pull till it runs clear, then dump the rest. As the water is not hydrocarbon contaminated, it can be pumped overboard through the bilge pump system.
Our water supply is now back in business, and all we need is a final treatment to remove those things we cannot see but will hurt us. We need a high-quality water filter between the tank and the outlets. Water filters range in design from UV (ultra violet) water sterilizers such as Water Fixer to in-line carbon filters similar to units we would use in our homes. There are sediment filters, taste filters, softeners, odor filters, and Structured Matrix technology that combine the capabilities of several types of filters. The Seagull IV System has an ultra fine submicron filter layer to remove all visible particles combined with a molecular sieving and broad spectrum absorption layer which removes chlorine, organic chemicals, specific pesticides, herbicides, solvents, taste, smell, and color. The final layer of the filter works by electrokinetic attraction removing small positively charged particles of the larger contaminants by attracting them to the negatively charged surface of the filter to remove colloids and other even smaller particles than those removed by the microfine filtration layer. By the time the water has passed through a filter of this type, it is probably purer than the tap water we have at home.
The cost of these filters runs from $30 to $500. You definitely get what you pay for, but for most of us a good annual tank cleaning and a $30 carbon filter will meet all of our requirements. Water purifiers are available if the quality of water you receive in a foreign port is in doubt. Purifiers can be used in conjunction with other filters to clean up most potable water problems. Remember, the water you take on must be potable. The world’s best filter cannot make contaminated water safe to drink.
The filter you have on board will need to be serviced once a year, preferably in the spring when you flush the tank after the winter layup. This usually means pulling the old cartridge and installing a new one at a modest cost.
The best way to assure a clean water supply is to exercise diligence in selecting the source of supply in the first place. Protecting your own and your family’s health are worth all the effort in cleaning your water supply.
Article from Good Old Boat magazine, March/April 1999.