Epoxy, fiberglass, and a little cunning fix an old problem
Tillers in some boats are known to break with regularity. If you’ve ever taken part in a drill of this nature, I don’t need to explain that it’s exciting. It’s a situation that leads one to look for an effective and permanent repair. I’ve had two boats with a history of tiller failures. But now I’ve got a fix that lasts.

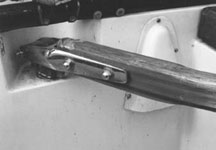
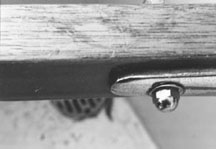
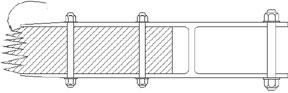
The typical failure is at the forward end of the tiller straps. In most boats this is an H-shaped affair that has a bolt to hold it to the rudder head and two or three more to secure the tiller in it. The strap-to-tiller connection is perpetually loosening, no matter what effort is made to keep it tight. The cross-mounted fasteners (bolts, screws) must maintain some load in order to stay tight. The load will actually cause some stretch in the fastener. That stretch will not be very much (a few thousandths of an inch), but without that stretch the joint will not stay solid. When a non-solid connection is worked, the outer ends of the strap start to bite into the tiller. This begins to break up the wood structure. It does not help at all that this action will punch through the finish and let water into the wood.
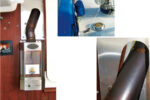
Salvaging a damaged tiller is a two-step process. You do not need to start with a new tiller. First you will need to create a structure that can maintain the load of the cross-mounted fasteners. Wood won’t do it. Epoxy loaded with a high-density, high-strength filler will do quite well, however. Drill the fastener hole out to about double the original size. Yes, you are going to drill a 3/8-inch hole out to 3/4-inch. Tape one side, and fill the huge holes you just made with epoxy that you have mixed with a high-strength filler – more is better. Be careful not to trap air bubbles. A syringe with a piece of small tubing helps. Wet the bare wood surfaces with unfilled mix before you start. It is good if you end up with the fill slightly above the surface. When the epoxy cures, drill new holes.
Short columns
What you have just done is manufacture short columns that are very much a part of the tiller’s structure and quite capable of accepting the compression load required to keep the fasteners from loosening (losing the stretch required to keep the joint solid). These columns will also now be the part that transfers the tiller load to the tiller straps. You can stop at this point or go on to the second step. You’ve already made a big improvement in your tiller.
Second step
The second step is to create a load spreader to mitigate the effect of the tiller strap on the sides of the tiller. You do this by glassing the sides of the tiller. You can take this step at any time even if you have already drilled the holes through the epoxy plugs and used the tiller for a season. Plane about 1/16 inch off both sides (1/8 inch total) in the area where the straps fasten.
That is about right for four layers of 9-ounce glass (most tape is 9-ounce). Taper this to about two tiller widths from the end of the tiller plates. If you use a nice clear epoxy to lay up the glass and as a finish coat, it won’t show much. How you do this lay-up is not important. I’ve used a bottom-cut taper (shortest piece on the bottom) so I can make the surface relatively smooth.
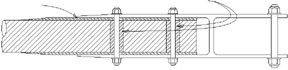
What you did in this step was to alleviate the problem that engineers refer to as a “stress riser.” This condition exists anywhere you have a structure that has a vast change of properties in a small area. This glass spreads out the load on the wood of the tiller in the area of the tiller straps in three ways. It distributes the high load caused by the end of the tiller strap so it will not break the wood fiber and finish coating. It increases the stiffness that the glass beyond the tiller plates brings to the tiller. And it transfers the tiller load more directly to the strap and bolts without causing any high local load on the wood of the tiller.
So far I’ve done this to four tillers. The oldest will be going out for its tenth season this spring. It doesn’t even creak. It is on a severely raced Tartan 30 that used to get three seasons at best from a tiller. The owner still carries a spare on long races, but he does not feel he has to carry the spare all season any more.
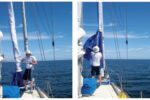
A moment you will recall
Call it what you will, a “moment of truth” or a “crisis:” once the tiller you’re holding in your hand is no longer connected to the boat, you’ll be wishing you’d taken the time to strengthen it. Having been there, Matt calls this “a moment you will recall.” He has learned from several experiences with tiller stubs what causes the problem and how to prevent it. It’s one of those “black box concepts” . . . an ounce of prevention is worth a pound of cure.
Article from Good Old Boat magazine, November/December 2001.