Beefing up a retired racer with aluminum
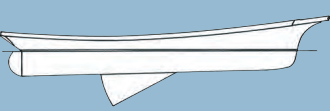
My mate, Karlene, and I looked long and hard for a sailboat suitable for world cruising that we could afford. I’ve become convinced that boat speed is an important component of voyaging safety, so a major goal in our search was to find a good old fast boat! In Tampa, Fla., we found a neglected Cal 48 yawl.
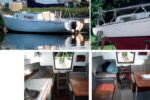
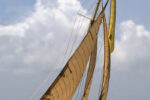
This boat had been raced hard and put away wet for too many years, and Karlene and I had our doubts as we motored out into Tampa Bay for our sea trials. We hoisted the baggy, tattered, but fully battened, main in a warm, 13-knot breeze, and off she skipped at 7 knots. We unfurled the jib and were stunned as she heeled gently and roared off at more than 9 knots. What fun! Concealing our excitement, we made an appropriate offer that eventually was accepted. In time, our Cal 48, renamed Koho, landed in Pocatello, Idaho, where we started the refit.
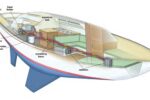
If you examine enough old classic plastic, you will find recurrent flaws and problems that span a range of manufacturers. Our Cal 48 was no different. She was plagued with stanchion and hull-to-deck leaks, as well as untabbed and broken bulkheads, which are especially prevalent in older racers like Koho. Nevertheless, we felt that our time and money would be better spent restoring a swift, old, racing sailboat than a slower, more traditional, cruiser. We hoped the payoff would be in sparkling noon-to-noon runs. The refit of Koho has been total, but I’d like to focus on the structural solutions changes that we made to the toerail and hull-to-deck joint.
Sealed holes
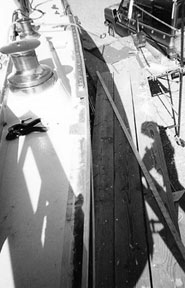
We stripped every piece of hardware off the hull and deck and sealed all the holes with epoxy. Nevertheless, steady rains revealed persistent leaks from one end of the boat to the other that were coming from the toerail. Our toerail was an attractive piece of teak, 1 1/4 inches by 2 1/2 inches, laid on edge and secured every 4 to 6 inches with 5/16-inch stainless steel machine screws covered with teak bungs. The teak toerail also covered the hull-to-deck lap joint. A first-generation mystery sealant bedded the joint.
Near the cockpit, a genoa track was bolted to the top of the toerail and secured by nuts and washers below deck. Under the genoa track, virtually every bolt leaked because of the substantial loads on the track from the huge sail. Reluctantly we took the Sawzall to our beautiful toerail. We made attempts to save the 4-inch stainless steel bolts, but most of them were severely corroded in the anoxic environment of the leaky toerail. We then lifted the deck off the hull, using dozens of wedges. Most of the bulkheads released the deck with minimal fuss.
Once the joint was free and the deck was lifted up a few inches, we could clean and blow out the gap and apply 3M 5200 marine adhesive sealant, rebolt the hull to the deck, and reattach the bulkheads with multiple layers of biaxial cloth and epoxy resin on both sides of the bulkhead. Critical, highly stressed bulkheads – such as the main bulkhead near the cap shrouds and the ones under the lowers – were given additional layers of fiberglass and epoxy.
Overkill, perhaps
On the main bulkhead, a laminated deckbeam was epoxied and bolted to the upper face of the bulkhead and epoxied to the underside of the deck. Stainless steel carriage bolts from the top of the deck were then fastened through this laminated beam. Strong? You betcha! Overkill? Perhaps, but I used this technique on a 39-foot boat I built some years ago. During a bad blow that boat was thrown sideways off a large wave and landed with a shattering crash on her port side and sustained no structural damage. The only downside to this technique is the time it takes.
The critical bulkheads also received additional aluminum angle reinforcement where they contacted the hull/deck joint, and bolts with backing plates and/or washers were placed around the perimeter of the bulkhead to mechanically reinforce the joint.
We next turned our attention to strengthening and sealing the hull-to-deck joint. The upper hull and decks on these Cals are thinly constructed, in keeping with their racing heritage. We concluded that the only feasible fix was to fiberglass the joint from the outside. To do this, the watertight but rough-appearing hull/deck joint was faired with filled epoxy and sanded, then multiple overlapping layers of biaxial cloth and mat were laid over the hull and deck joint to a thickness of nearly a quarter-inch. More fairing, compounding, and sanding was done to ease the transition between old and new glass.
Prohibitive cost
The next task was to design and build a new toerail. We looked at many options. Commercial aluminum toerail was feasible but the cost was prohibitive and what about all those holes every few inches in our now watertight deck? Hal and Margaret Roth, on Whisper, used a clever method detailed in their book After 50,000 Miles. They brazed Everdur (silicon bronze) plates to the outside of the stanchion bases and then attached a 1-inch by 4-inch teak toerail outside the stanchions to the Everdur plates. They raised the teak 3/4 inch off the deck for water drainage. This seemed like a good idea. Reapplying a wood toerail or bulwark remained an option, but I wanted to avoid the leaks and maintenance associated with wood.
Years ago I worked on commercial salmon boats in Alaska. I remembered how the aluminum gillnetters used 1/2-inch by 2-inch flat bar stock as a toerail. It was welded edge-up to an angle extrusion at the deck edge to stiffen that vulnerable area from impacts with tenders and rough docks. I have long believed that aluminum is the best material for cruising boats, but we were unable to find a suitable aluminum boat that we could afford, and I began to wonder if aluminum and fiberglass could be married during Koho’s refit, thereby gaining the advantages of both materials.
We considered having aluminum angle bent to match the outside curve of our hull and deck. We had different angle extrusions bent at a local fabrication shop, but the differing and constantly changing angles of the hull and deck made this idea unworkable. We rejected welding as well.
Screwed and bolted
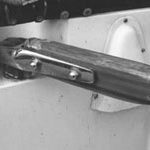
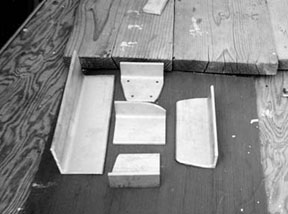
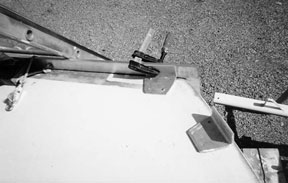
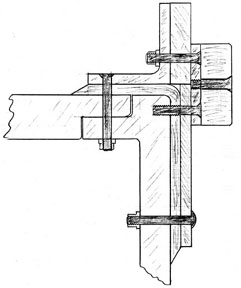
Eventually we settled on overlapping flat bar stock screwed and bolted together. In some areas, the aluminum was prepped and epoxied together, but the bulk of the construction used 3M 5200, 1/4-inch screws, and stainless steel bolts attaching the plates to each other and to the hull. The most useful and crucial part of the design is the 1/2-inch by 2-inch flat bar stock that becomes the toerail. The sections are 12 feet long with 1/8-inch gaps on the ends for expansion in the severe climatic changes we experience in the Rockies. The toerail is stiffened at the joints where these flat bar sections meet with brackets made from 1/4-inch aluminum angle, bandsawed and sanded to a pleasing shape, and bolted to the toerail and deck using oversized holes.
Holes are drilled in this flatbar in key areas in a manner similar to the commercially available perforated aluminum toerail. The toerail is supported at about 3-foot intervals by the support brackets. Every other support bracket has a stanchion base. Bolts fasten through the stanchion base, toerail bracket, and the deck to aluminum backing plates beneath. Once bolted or tapped and fastened together with machine screws and 5200, the whole assembly is astonishingly stiff and robust.
After installing the toerail, we attached a 1/4-inch by 4-inch aluminum plate to the hull so that it fit directly under the toerail and in contact with it. This served to cover the fiberglass overlap and strengthen the joint. We called this piece the “hull plate.”
Rigid structure
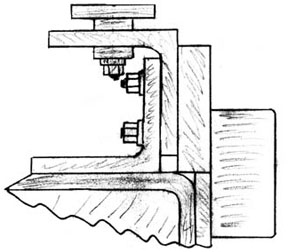
A final 1/4-inch by 2-inch flat plate was tapped and screwed to the toerail above and the 1/4-inch by 4-inch hull plate below. This effectively joined the toerail to the hull plate, making a very rigid structure that could not have been cold formed in place if it had been a single piece.
A 3/4-inch by 2-inch section of white UHMW (ultra-high molecular weight) polyethylene was fastened with flat-head machine screws into tapped holes in this bar to form a rubbing strake.
Tapping the aluminum allows replacement or repair of the UHMW in the future. I considered wood, aluminum, and PVC. We felt that UHMW offered a durable material that was a more friendly surface against the tender topsides of fellow yachties. I have high regard for UHMW. I’ve used it wherever friction needs to be reduced. For example, I lined a chute with UHMW to feed our anchor chain into the chain locker. The anchor chain glides into the locker as if sliding on Teflon. We also used it in front of our deck cleats in lieu of deck chocks to reduce chafe on the lines.
The aluminum bar stock and extruded angles that I used were alloy 6061, which is the normally available alloy for extrusions. This 6061 is commonly used in aluminum yacht and workboat construction, but it is best used in above-water applications. It has less corrosion resistance than the true saltwater alloys such as the 5000 series. We plan to paint the aluminum for the sake of an improved appearance.
Plastic spacers
We took great care to make sure no copper containing alloys came in contact with the aluminum. Our stanchion bases are made of either bronze or 316 stainless steel. They were made locally and they have a thin plastic (UHMW) spacer isolating the stanchion bases from the aluminum bracket beneath. The aluminum was painted with epoxy and linear polyurethane paint, and while that is probably sufficient isolation from stainless, it’s not that much more work to put in a little polyethylene spacer. We attached the genoa track to a 2-inch by 2-inch by 1/4-inch length of aluminum angle bolted to the inside of our aluminum toerail. This tactic alone saved almost 100 holes through the deck. The aluminum angle was bent using a plywood template by a local steel shop to conform exactly to the curvature of the deck. The track angle is braced additionally every 4 feet with aluminum angle bolted to the deck and glued with 5200. The finished track seems sturdy and superior to what it replaced.
In our most heavily loaded bulkheads I placed the toerail aluminum angle brackets over the interior structural bulkheads. Additional aluminum angle pieces were bolted to the bulkheads and fastened to the angle toerail brackets above to tie all these components together. The oversized deck cleats were bolted over the bulkheads to the aluminum angles below. This is considerably stronger than just using conventional backing plates.
The majority of vessels I’d examined weren’t husky enough to cope with the boisterous high-latitude offshore sailing conditions we expect Koho to encounter. I think that aluminum construction is superior to all other boatbuilding methods if you want to wed lightness and strength. My concept during this refit was to use this superb material to strengthen and stiffen an older fiberglass sailboat, utilizing one of the most abundant elements in the earth’s crust.
Article from Good Old Boat magazine, May/June 2001.