A small project that brings satisfaction and pride.
An acquaintance raised the question concerning those little wedges that hold the mast in column on many boats. On a recent sail in blustery conditions, the wedges on his boat worked loose and fell into the cabin. He wanted to know how to prevent this from happening again.
An area of boat maintenance that is often overlooked is where a keel-stepped mast passes through the deck. Perhaps the boatyard takes care of this when the mast is stepped. But don’t count on it. In my case, the yard stuck the mast in the boat, attached the shrouds, tightened them sufficiently so the mast would stay in place, and left the rest for me to do when the boat was in the slip.
I was left with tuning the rigging and the more pressing job of wedging the mast. If the mast is not wedged snugly it will “work” or flex under the varying loads on the sails. This flexing can weaken the mast. The common solution is to drive rubber wedges between the mast and the flange (a turned-up edge around the hole where the mast passes through the deck). On my boat this flange is 3 inches high.
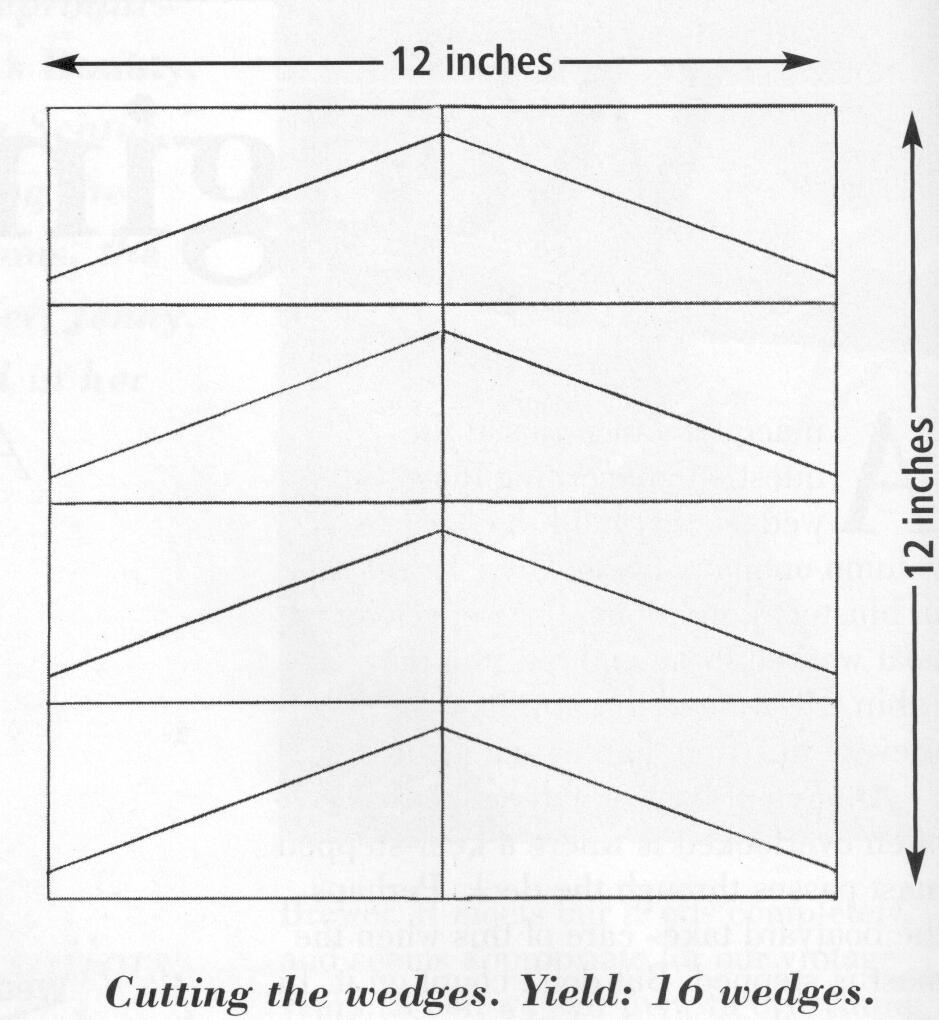
Cutting the wedges. Yield 16 wedges.
A newer technique is to use Spartite. After placing a temporary bottom or floor below deck around the mast in the overhead, Spartite liquid is poured around the mast from above. After this liquid hardens, the temporary bottom is removed, the mast is held in place, and leaks are prevented. The precaution to observe in using Spartite is to be sure that the area between the mast and the deck flange has a slight taper outward toward the top of the mast. If it does not or is tapered the opposite way, it will be difficult or impossible to remove the mast without chiseling the Spartite out, as it adheres tenaciously to the mast. With the proper taper, the Spartite will come out with the mast and can be reused when the mast is re-stepped.
Time-honored
I use the time-honored rubber wedges on our boat. Since I bought our boat as a project boat, it didn’t come with wedges. So I went to a store that carried rubber products of all types and purchased a piece of rubber mat from their scrap supply. (Shore hardness 40 to 50 is good.) This material was a foot square and 2 inches thick. With the mast centered in the hole in the cabintop, I had approximately 11Ú4 to 11Ú2 inches between the mast and the flange around the hole. I marked and cut the rubber, using a band saw, into wedges approximately 21Ú2 inches at one end tapering to 1Ú4 inch at the other end (see sketch). The wedges were approximately 6 inches long. The piece of rubber yielded 16 wedges, far more than needed for the boat.
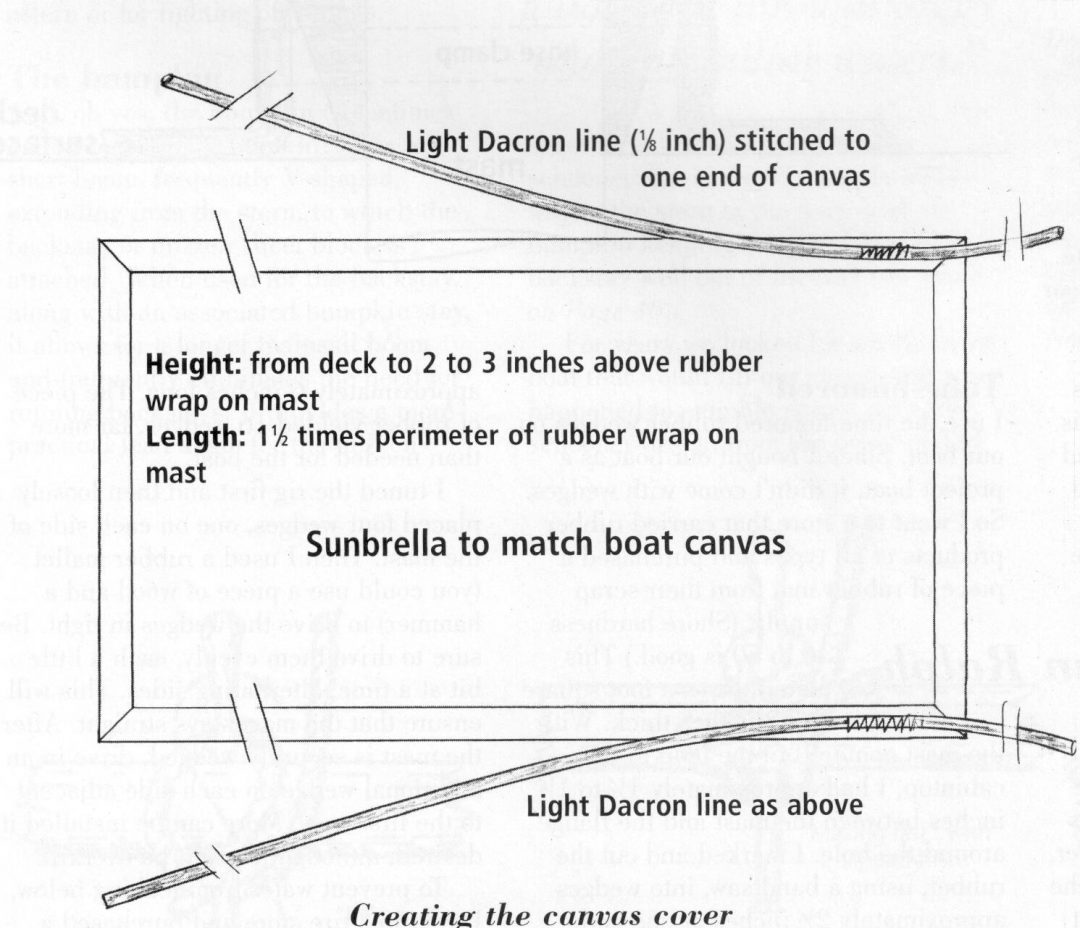
Creating the canvas cover
I tuned the rig first and then loosely placed four wedges, one on each side of the mast. Then I used a rubber mallet (you could use a piece of wood and a hammer) to drive the wedges in tight. Be sure to drive them evenly, each a little bit at a time, alternating sides. This will ensure that the mast stays straight. After the mast is securely wedged, drive in an additional wedge on each side adjacent to the first ones. More can be installed if desired, although it might be overkill.
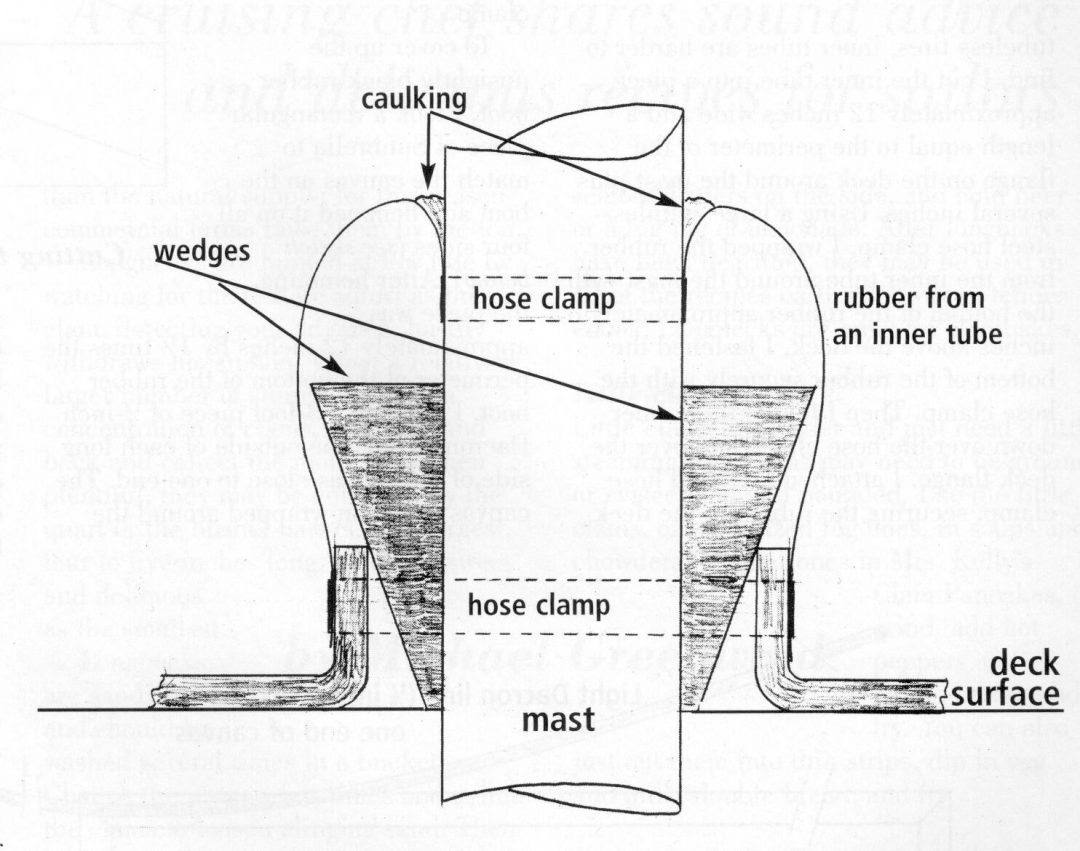
To prevent water from leaking below, I went to a tire store and purchased a truck-sized inner tube. A used one will work as well as a new one. In this day of tubeless tires, inner tubes are harder to find. I cut the inner tube into a piece approximately 12 inches wide and a length equal to the perimeter of the flange on the deck around the mast plus several inches. Using a large stainless-steel hose clamp, I wrapped the rubber from the inner tube around the mast with the bottom of the rubber approximately 8 inches above the deck, I fastened the bottom of the rubber securely with the hose clamp. Then I folded the rubber down over the hose clamp and over the deck flange. I attached a second hose clamp, securing the rubber to the deck flange. If you can’t get long enough hose clamps, hook two or more clamps together to get the proper length.
Using a tube of silicone caulking and a caulking gun, I liberally caulked the top of the rubber where it folds back over the top hose clamp next to the mast. This will keep water from seeping down the mast past the rubber and hose clamp.
To cover up the unsightly black rubber boot, I took a rectangular piece of Sunbrella to match the canvas on the boat and hemmed it on all four sides (see sketch). After hemming, the piece was approximately 12 inches by 11Ú2 times the perimeter of the bottom of the rubber boot. I stitched a 3-foot piece of 1Ú8-inch Dacron line on the outside of each long side of the canvas close to one end. The canvas was then wrapped around the rubber boot, the end without the Dacron line placed first and overlapping itself to ensure complete coverage. Then I wrapped the Dacron line around the cover and tied it with a square knot. This completely covers the rubber boot and leaves a waterproof, yet attractive, finished look. The silicone sealant is also protected from deterioration from the sun.
When pulling the mast, all that is needed is to remove the canvas cover and the bottom hose clamp. When the mast is pulled, the wedges will come loose and can be collected for reuse.
This is not a high-tech project, but it is one that will give much satisfaction and pride. And that is part of the enjoyment of owning a boat.
About that rig… Record rig “tune” before you pull the mast. Record location of any shims between the mast and the step. Tune the rig fore and aft and side to side before wedging the mast. Some kinds of rigs may benefit from wedges fore and aft as well.
Refer to Illustrated Sail and Rig Tuning by Ivar Dedekam for details on rig tuning.
A 1988 trip to the Gulf Coast exposed Norman and his wife, Jeanette, to year-round sailing and sowed the seeds that initiated early retirement and a move to Lake Pontchartrain in Louisiana. Norman is able to rest in peace knowing his boat won’t leak (at the mast anyway).
Article taken from Good Old Boat magazine: Volume 4, Number 6, November/December 2001.