

Whether a cosmetic or structural issue, a thorough investigation of any blister problem is warranted
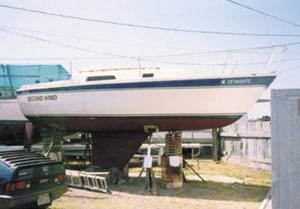
People often ask whether gelcoat osmosis problems – generically called “blisters” – are just cosmetic blemishes or a source of damage to the hull laminate. Since I recently completed a blister repair job on Second Wind, a 1979 Cal 2-25, and began another on Can Do II, a 1971 Ericson 27, I put pen to paper to present my findings, methods, and opinions for others contemplating such work. Not all blister problems are as bad as those recounted here, but I do feel strongly that a thorough investigation of any blister problem is warranted in the long run.
During gelcoat removal (note holes in blue gelcoat).
While researching the causes and effects of blisters, I found more than one explanation of the cause and many opinions as to whether they actually damage laminate. The most common explanation of the cause of blisters is that polyester resin (gelcoat) is susceptible to osmosis, and the absorbed water reacts with any solutes remaining in the laminate to create an acidic solution. This solution is under pressure and causes the gelcoat to blister. Certainly, any solution present is acidic, but I’m not certain whether it causes laminate damage.
With the gelcoat removed (note light-colored voids).
With regard to effects, there are those who claim that, given time, the solution will attack the laminate, while others are adamant that the effect is simply a “cosmetic” issue. In my opinion, both arguments are correct. It seems to me that the laminate problems on Second Wind may well have caused the blisters and were not caused by the blisters. More about that later.
Blisters and voids filled and roughly faired (note large filled area at the waterline).
However on Can Do II, the gelcoat in a number of areas was actually starting to lift off the laminate. The first layer of laminate could be easily peeled off for a distance of 1/4 inch around the larger blisters. In fact, some of the larger blisters were surrounded by rotten laminate which extended through the entire thickness of the hull. This was most evident in one area of the encapsulated keel. I eventually drained four and a half gallons of salt water from the keel housing! Obviously Can Do II had laminate damage, but was it a result of the blister reaction or of extremely poor lay-up in the first place? I am not able to answer that question.
I feel that blisters should be looked on as potentially damaging, and it is dangerous to make a statement that they are just a “cosmetic” nuisance without having first removed all the bottom paint and carefully inspected them.
Survey says
When I purchased Second Wind, I relied on a year-old survey regarding the condition of the underwater portion of the hull and my own observations for the rest of the boat. The surveyor stated (I added the highlighting for emphasis): “The majority of the hull surface below the waterline shows extensive osmotic blistering. The blisters are approximately 1/4- to 1/2-inch in diameter. Several of the blisters were punctured. The punctured blisters emitted a foul smelling, sour liquid. Some of the blisters appeared to have formed over a dark colored fairing compound, indicating the hull may have had previous blister repairs. The blisters, opened and probed, showed no involvement with the underlying glass laminate.”
I called the surveyor and questioned his definition of “extensive.” He told me that meant around 200 or so blisters on the hull.
Inspection
Once I had Second Wind in my yard, I was able to confirm that the reported blisters had not worsened. There were, however, signs of additional blistering. The bottom paint was very thick, old, and in need of complete removal.
Since I had read a number of favorable reviews of the Peel Away product, I decided to give it a try. After experimenting on a few small patches, I found I could apply it in sufficient thickness (1/8 inch) by laying it on using a 6-inch paintbrush and that between 8 and 12 hours working time was sufficient to soften the paint. The softened paint was easily removed with a wide-blade putty knife.
For those who have not seen or used Peel Away, it is a paste that, once applied, is covered with a plastic material and left to work for a period of time. If it is left too long, it will dry out and become nearly impossible to remove. I have heard that it will not work very well at temperatures lower than 70oF. If you do decide to use it, experiment with small test areas to determine the working time needed. Also keep in mind that it needs to be applied thickly. Use too little, and it will dry out before the paint is softened.
When the paint is softened sufficiently, you can peel off the covering while lifting the paint with a putty knife. This results in the paint staying on the covering but, as I found, the removed material will get very heavy, so it is best to have an extra pair of hands to assist with removal.
The Peel Away people market an excellent spray liquid for residue removal, but I found that the household 409 cleaner was equally as good at a fraction of the cost. I also found that household waxed paper was as effective a covering as the original plastic product, with the added advantage of lower cost and, due to its narrower width, being much easier to use.
Once the paint was completely removed, I was astounded at the number of small blisters that had been uncovered. There were thousands! I popped a number in one area and realized that there would be so little gelcoat left after popping all of them, I would be better off to completely remove the underwater gelcoat.
Gelcoat removal
Having made the decision to remove the gelcoat, I was left with the question of how to accomplish the task. I contacted a company in a neighboring town that used a Gelcoat Peeler, but they were not interested in doing the job unless it was in their yard (50 miles away). None of the local sandblasting outfits had experience with gelcoat removal, so I was left with the final option: doing the job myself.
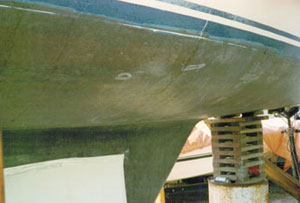
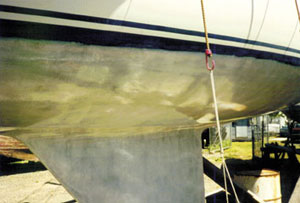
Sealed with penetrating epoxy.
First I tried a high-speed 6-inch orbital sander using 100-grit disks. Then I changed to 80-grit and finally to 50-grit. It didn’t take too long to realize that that method was slow and dirty and that I would be spending a lot of money for disks. Next I tried a 6-inch rotary sander which was too heavy for the overhead work. Then I used a 4 1/2-inch rotary sander, using 36-grit disks. This was faster than the orbital, but it was also extremely easy to accidentally grind into the laminate.
The final fairing mix applied with notched spreader.
So what to try? Chemicals? I left messages on the Internet and didn’t receive any replies specifically about chemical removal. My local marine supplier said, “Nobody chemically removes gelcoat.” Browsing in my favorite hardware store, I noticed Jasco Premium Paint and Epoxy Remover. The words “epoxy remover” caught my eye, and I decided to purchase a pint can and give it a try.
First coat of tinted epoxy.
What I found was that it would soften the gelcoat, so it could be scraped off. It worked within two to three minutes, but when left on longer, the active ingredients evaporated and the gelcoat rehardened. The only problem was that the gelcoat was not softened to its full depth. I found that most areas required two applications, with some requiring three. I also noticed that if any of the chemical reached the laminate, it ate into it. So I decided to stop applying it once I could see signs of the laminate through the blue gelcoat. The scraper I used was one of those long-handled paint scraper jobs that have a replaceable four-sided blade.
The results of six coats of tinted epoxy.
Armed with this knowledge, I set about removing the bulk of the underwater gelcoat. This went much better: no noise, no dust, just a pile of dried up scrapings to clean up. One item I caution about here: while it does not actually harm or mark the skin, if you get any of the chemical on your bare skin, it really lets you know with a severe burning sensation. If you use this preparation, make sure you are well covered or, as I did, keep a bucket of water handy to wash in. Why didn’t I cover up? It was early summer and above 90°F.
The final film of gelcoat was removed with the orbital sander, using 50-grit disks. This proved to be an easy task as, even though the gelcoat had hardened again, it was not as hard as it had been, and it turned to dust easily. During the removal, I noticed:
- The gelcoat was in two distinct layers: an outer white layer and an inner blue one.
- Three out of 10 blisters larger than 1/2-inch diameter contained liquid.
- One out of 100 blisters smaller than 1/2-inch diameter contained liquid.
- The blue layer contained a huge number of perfectly round holes that were not the result of visible blisters in the white layer. I’m not certain whether these holes would have eventually resulted in blisters, but I am inclined to think they would. The only other explanation for these holes is that they were a result of improper lay-up originally. Even if this were so, I still think they would be prime candidates for future blister problems.
To recap, the chemical removal process was probably no faster than sanding or grinding, but it was easier, cleaner, and cost less. The main benefit was that, in the main, I hadn’t destroyed the fairness of the hull, a very important factor. Now that the laminate was bared, I cleaned it thoroughly using a high-pressure water sprayer.
Inspection
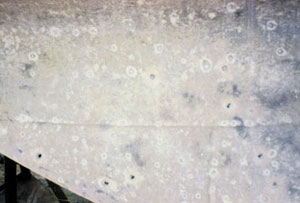
Careful inspection of the bared laminate revealed a few areas where it was slightly damaged and a disturbing number of areas where voids were visible just under the first laminate layer. A lot of these voids were directly beneath areas where the larger blisters had been. The presence of a void is immediately obvious when looking at bared laminate. Good laminate is usually a uniform dark color, and voids stand out as a much lighter color. The color is lighter where the void is closer to the outer layer.
One void that did not have blisters above it was in the keel housing. Its position was at the lower portside leading edge, 18 inches up from the bottom and 1 inch aft of the leading edge. It extended aft for 6 inches and was 3/8-inch deep. The most disturbing thing about this void is that I spoke with another Cal 2-25 owner who found the same void in his keel housing.
All that was nothing when you consider the many voids, although small in size, at the waterline around the full circumference of the hull. I make the observation that these voids were a result of improper original lay-up based on the fact that they were all under the outer layer of laminate.
Perhaps the worst of these voids was in the shape of a sideways T, 14 inches long on the horizontal, 8 inches on the vertical, and approximately 1 1/2 inches wide, right where the original surveyor had detected a patch of high moisture content. I probed this area and found it contained the dreaded acidic solution.
I carefully cut away the top of this void, washed it out, and inspected it further. It was 3/16- to 1/4-inch deep, and the laminate surface was glossy. This tells me that this void was an air bubble, a result of improper lay-up, which probably always contained an amount of unevaporated solute.
Treatment
Using a small bullnosed stone mounted in a drill, I ground out the few areas of laminate where blisters had left their mark and opened up the remaining void areas with the 4 1/2-inch sander and 36-grit disks. Then I pressure-washed the hull again and left it to dry out for a full Sacramento summer with its 100°F heat and low humidity.
Correction
That fall I applied two coats of a thin, penetrating, epoxy to the hull. This serves (by capillary action) to seal any bare fiberglass ends and to close any minute indentations in the laminate. I let this coating fully cure for two weeks. Then I sanded the hull with the orbital sander, using 100-grit disks. This sanding is required to give the epoxy coatings that follow a firm-toothed base on which to adhere. It also serves the purpose of highlighting any areas which are not fair. The opened voids were tapered out and filled with epoxy and layers of bi-axial plus mat fiberglass material. I filled areas in need of fairing with an epoxy-microballoon-silica mix putty.
After curing and sanding down these areas, I carefully inspected the hull for fairness. I filled areas that still were not fair with the putty mix, using a notched spreader. The purpose of using a notched spreader is so that when you use a long-board to sand them fair, you are only sanding the ridges. This saves a great deal of sweat. You are then left to fill the valleys with putty, up to the top of the ridges. A final touch-up with the long-board, and you are done. There is one field of thought that, to build up thickness and assist in fairing, you should plaster the hull with fairing mix and then long-board the whole thing. Fortunately, because I was careful in removing the gelcoat, the hull was generally fair and required little additional filling work, so I didn’t fully coat it with fairing compound.
Closing up
Due to the thickness of the original gelcoat, I was unsure about how many coats of epoxy would be needed, but I decided on at least five. Using two people, with one rolling and one tipping, we were able to do one coat of epoxy in less than two hours, by which time the first areas had set up enough so we could immediately apply another coat. I applied nine coats of epoxy. This allowed me sufficient leeway for a sanding to provide a key for the final finish.
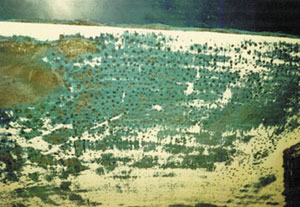
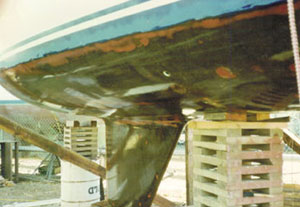
Blisters before the bottom paint was removed.
Each of these coats was tinted white. I varied the tint amount for each coating. This made it much easier to see where I was placing the new coating, otherwise there is a very real possibility that you will miss areas with subsequent coatings.
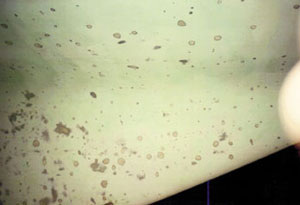
Blisters after the bottom paint was removed.
Though it probably wasn’t really necessary, I then applied two coats of Interlux 3000/3001 barrier system. This was done just to minimize the possibility of future problems. While epoxy is not as susceptible to osmosis as polyester is, it is not impervious, and the 3000/3001 reportedly has additional solids (platelets) to assist in osmosis prevention.
Materials used
The following is not meant to be a recommendation of one product over another; it is purely a list of what I used and the reasons for doing so.
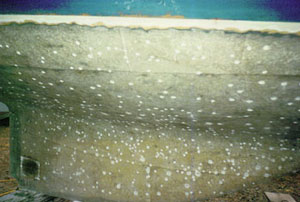
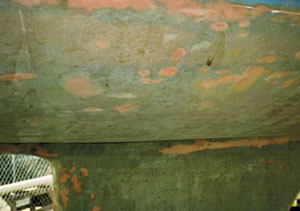
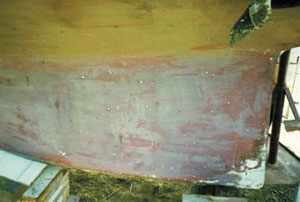
Opened blisters after the gelcoat was removed; blisters in keel housing (note holes through laminate and damaged laminate around the blisters).
All epoxy products were from System Three in Seattle. I used their Clear Coat product for hull sealing and their Laminating Epoxy for all other work.
Blisters in keel housing.
I evaluated West System products and, while I could not fault them, I decided on System Three mainly because of price, delivery, and the recommendations of some yards in my area. Another reason for choosing System Three was their claim that subsequent coats of epoxy would chemically bond to the under layer if applied within 72 hours. This certainly was a big consideration as, otherwise, I would have been faced with occasionally sanding between coats.
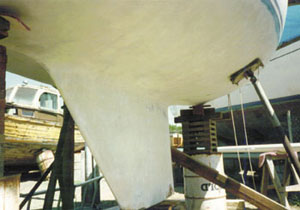
After five coats of epoxy.
I also evaluated some of the lower-cost epoxy products and rejected them because I felt they were lacking in solids for this kind of job. The System Three product has certainly done all I’ve asked of it and seems to be very forgiving with regard to very small variations in mix ratios. I also used a microballoon-silica mix from System Three because it was easy to have them include it in epoxy deliveries.
The silica I used was West System Colloidal Silica (cab-o-sil), which I obtained locally. Silica, by the way, prevents sagging of the mix and provides greater strength. However, if you use too much of it, you are in for a hard time in areas where sanding is necessary. I took advantage of this fact to apply a layer of epoxy-silica mix to the keel bottom. It definitely resulted in a strong, hard, surface. But it was a bear to sand to shape.
The fiberglass cloth I used was Knytex, a bi-axial/chopped strand material, 23-ounce weight, which I purchased locally. It has the advantage of bulk (mat) plus strength (bi-axial). The three layers are sewn together and, because it is not woven, it results in a reasonably smooth finish.
Conclusion
To quote from System Three’s The Epoxy Book: “Blister repair, being an inexact science, is one where you pays your money and takes your chances.” The extent of the chances is entirely up to you and your willingness to do the job correctly. I am still unsure whether blisters cause laminate damage or if blisters are a direct result of poor laminate lay-up. Either way, I would strongly urge you to carefully inspect blistered areas. It is not sufficient to simply correct those that are visible through the anti-fouling layer. Where you have some blisters showing, there is a good possibility that there are many more covered by the anti-fouling.
My good friend, Bob Larsen, (Dutchtreat, also a Cal 2-25) has reminded me that his boat had some blistering when he purchased it. When the bottom paint was removed, there were thousands of very small, less than 1/8-inch diameter, blisters. Bob had the gelcoat lightly sandblasted. This opened all the blisters. He then thoroughly cleaned them, skirted the hull with plastic, and allowed it to dry out.
He next filled all the blisters with two-part fairing compound, sanded them fair, and applied five coats of Interlux 2000/2001 barrier system. He reports no sign of recurring blisters in the two years since he did the job. The job was completed over five months of off-season weekends. So, fortunately, not all blister problems are as bad as the ones I encountered. It is a matter of inspection to decide the severity of the problem. Inspect for blistering immediately when the boat is hauled. If left to dry out, many blisters will disappear, only to re-appear once the boat is back in the water.
Periodically remove all the old bottom paint. Check for small cracks in the gelcoat. If any are found, you can be assured that there are small blisters that have drained through the crack. Be wary of using a sand blast process to remove the bottom paint. Prior owners of Can Do II had used blasting, and the underwater gelcoat was so thin in places that I initially thought it was just a coat of paint.
Any concentrated areas of blistering may indicate laminate voids and damage. I recommend that you remove the gelcoat in that area and carefully inspect the laminate.
If you do have a blistering problem and intend to correct it, make sure you allow sufficient time for the hull to dry out. Also make sure you sand the hull properly before you apply any barrier coating. Failure to do so will certainly mean you have to redo it in a very short period of time.
Never has the old saying, “If you don’t have time to do it correctly now, how will you find time to redo it later?” had more meaning than when it comes to the job of blister repair.
Article from Good Old Boat magazine, September/October 1999.